
7 Perfect Gooseberry Pie Secrets (Expert Guide)
Gooseberries transform from tart green gems to sweet purple treasures as they ripen, making them one of the most versatile berries for pie making. While these small fruits might seem humble, they pack a flavorful punch in every bite of our traditional family pie recipe.
In fact, gooseberry pie has been more than just a dessert in our family – it’s a cherished tradition that brings together the perfect balance of sweet and tart flavors. A single slice contains 474 calories and delivers a satisfying combination of 16g fat, 82g carbohydrates, and 4g protein. Furthermore, this recipe yields 8 servings, making it perfect for family gatherings.
I’m excited to share our time-tested family recipe that features a flaky crust and juicy filling, traditionally baked at 375°F for 45 minutes. We’ll explore everything from proper berry preparation to the secret of using tapioca as a thickener – a crucial technique that ensures the perfect pie consistency every time.
Table of Contents
The Heritage Behind Grandma’s Gooseberry Pie Recipe
Pie making runs deep in my family’s roots, stretching back to when my grandmother first learned the craft at her mother’s side. Throughout generations, we’ve preserved this culinary heritage, particularly our cherished gooseberry pie recipe, which dates back centuries in European kitchens.
Family traditions in pie making
My earliest memories involve standing beside my grandmother, watching her skillfully prepare pies with the same dedication my father showed when he learned baking as a young boy. Moreover, these kitchen sessions weren’t just about cooking – they became treasured moments where stories were shared and techniques were passed down with careful attention to detail.
Why gooseberry pie became a cherished dessert
Gooseberries earned their special place in our family’s heart primarily because they were the first soft fruit of summer, traditionally cropping as far north as the Shetland Islands. Additionally, these berries have been cultivated in Britain since the fifteenth century, making their way to America with British settlers. The fruit’s perfect balance of sweet and tart notes made it ideal for creating rich, flavorful treats that became centerpieces at family gatherings.
Secret techniques passed down generations
Our family’s secret techniques, passed down through generations, include these essential steps:
- “Heading and tailing” the berries with sharp scissors – a crucial preparation step
- Cooking berries with sugar until perfectly soft, typically for ten minutes
- Reducing excess liquid to create a concentrated syrup that enhances the fruit’s natural flavor
Notably, these methods weren’t just about following steps – they represented our family’s commitment to preserving tradition. Before refrigeration, these pie-making techniques allowed families to make the most of fresh produce while creating memorable desserts. The practice of sharing these recipes has become a bridge between generations, connecting us to our roots while creating new memories around the kitchen table.
Essential Ingredients for Traditional Gooseberry Pie
Fresh ingredients make all the difference in creating an authentic gooseberry pie. From selecting the perfect berries to measuring precise amounts of pastry ingredients, each component plays a vital role in the final result.
Selecting and preparing fresh gooseberries
For this recipe, I primarily use green gooseberries, as their tart flavor creates an ideal balance in the pie. First thing to remember, both green and red varieties work well – though red gooseberries need less sugar due to their natural sweetness.
The preparation process starts with a thorough rinse under cold water. Specifically, the berries require careful trimming – removing both the stem and the small brown end on the opposite side. For the perfect pie filling, you’ll need 4 cups of trimmed gooseberries.
The perfect pastry ingredients
The foundation of our pie lies in these essential ingredients:
- 2½ cups all-purpose flour
- 1 teaspoon salt
- 1 cup (2 sticks) chilled unsalted butter
- ¼ to ½ cup ice water
For this purpose, the butter must be cut into small pieces and kept chilled until use. Consequently, this ensures the perfect flaky crust texture that’s characteristic of traditional gooseberry pie.
Traditional spice combinations
The secret to enhancing gooseberry’s unique flavor lies in subtle spicing. Essentially, nutmeg stands as the traditional spice of choice, adding complexity without overpowering the natural tartness of the berries. The filling requires a careful balance of sweetener – typically 1½ cups sugar, though this can be adjusted based on the berries’ natural sweetness.
The thickening agent plays a crucial role in achieving the perfect consistency. While flour serves as a traditional option (¼ cup per pie), cornstarch can alternatively be used at half the quantity. Both ingredients need proper cooking time to activate their thickening properties, ensuring a perfectly set filling.
Mastering Grandma’s Pie Crust Technique
Creating the perfect pie crust requires mastering temperature control and precise techniques. I’ve learned through years of practice that success lies in the details of each step.
The cold butter method
Temperature control stands as the cornerstone of a flaky crust. The butter must stay cold throughout the entire process – straight from the refrigerator or even frozen. I’ve found that grating frozen butter directly into the flour mixture creates ideal-sized pieces that form perfect layers. Subsequently, this method prevents the butter from warming too quickly, which could result in a tough, chewy crust.
Perfect dough consistency tips
Achieving the right dough texture requires careful attention to moisture levels. The dough should clump when squeezed together, requiring anywhere from ¼ to ½ cup of ice-cold water. Primarily, I focus on the visual and tactile cues – the mixture should resemble coarse meal after incorporating the butter.
A crucial step involves coating a portion of the flour with cold butter properly before adding the remaining flour. Alternatively, if the dough becomes too warm during mixing, a quick 20-minute rest in the freezer helps maintain the desired consistency.
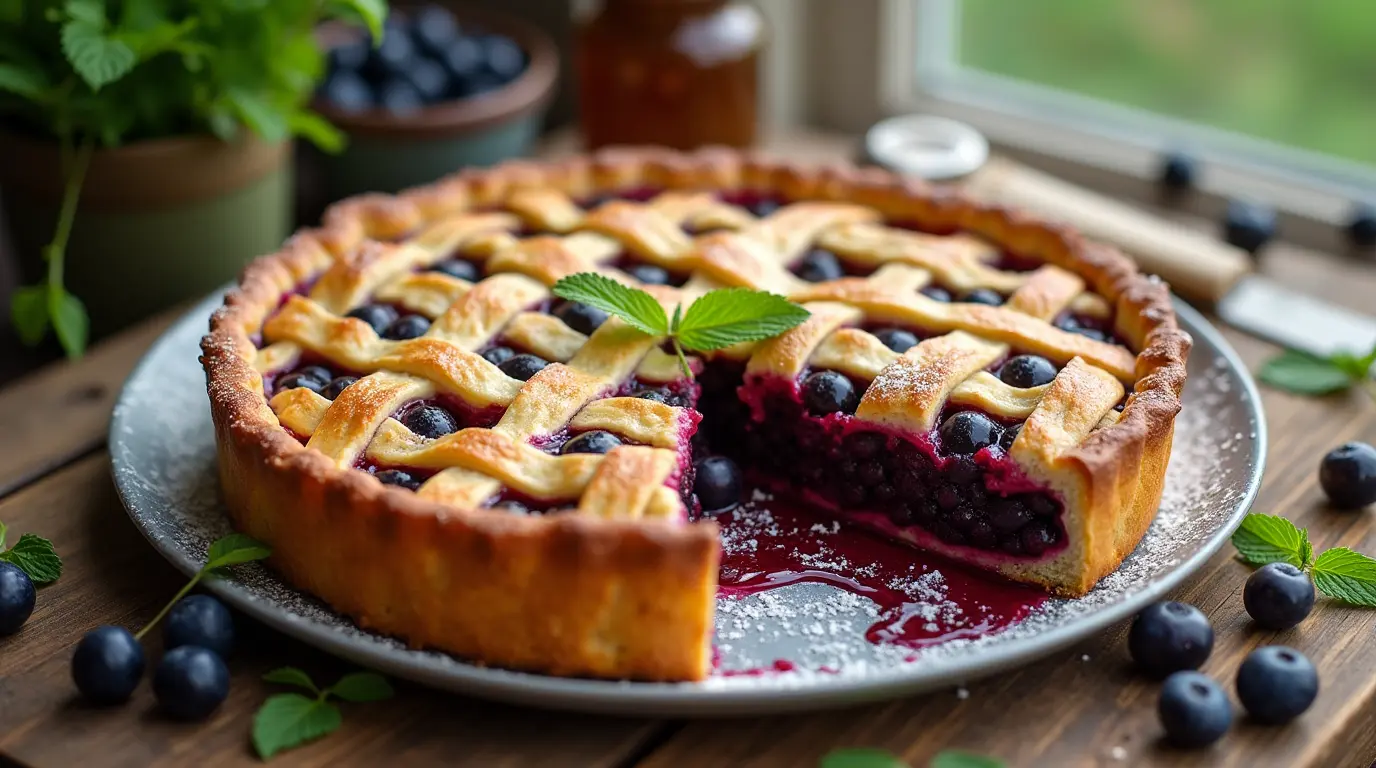
Traditional crimping patterns
The finishing touch lies in creating beautiful edges that seal in the filling. Here are the classic crimping techniques I’ve mastered:
- Traditional V-shape: Press the dough between thumb and forefinger, creating uniform V-patterns around the edge
- Scalloped edge: Use gentle finger impressions for a delicate, wave-like pattern
- Fork chevron: Press a fork at alternating 45-degree angles for an intricate design
Carefully chilling the dough after crimping proves essential – it helps maintain these decorative patterns during baking. Ultimately, the key lies in working quickly and efficiently, keeping all tools and ingredients cold throughout the process. For best results, I always chill the mixing bowl, bench scraper, and baking vessel beforehand.
Creating the Perfect Gooseberry Filling
The art of creating a perfect gooseberry filling lies in understanding the delicate balance between sweet and tart flavors. Initially, I learned that gooseberries possess a unique flavor profile – imagine a cross between a grape and a sour cherry.
Balancing sweetness and tartness
The type of gooseberries used directly influences the amount of sugar needed. Green gooseberries require 2 cups of sugar for every 3 cups of berries. Alternatively, red varieties need less sweetening as they naturally contain more sugar. The filling achieves its perfect balance through careful cooking – simmering the berries with sugar until they soften and release their natural juices.
Traditional thickening methods
A properly thickened filling prevents the dreaded “soggy bottom” pie. Primarily, I rely on 3 tablespoons of quick-cooking tapioca as my thickening agent. The tapioca works beautifully to create a filling that holds its shape when sliced. Some traditional variations include:
- Cornstarch mixed with water to form a paste
- All-purpose flour (2-3 tablespoons)
- Combination of flour and beaten egg yolks
Proper berry preparation techniques
The success of your filling starts with proper berry preparation. Each gooseberry requires careful “topping and tailing” – removing both the stem and bloom ends. After cleaning, crush about half a cup of berries in the bottom of your saucepan. This technique releases the natural pectin, helping achieve the ideal consistency.
The cooking process requires attention to detail. Place the prepared berries over medium-low heat, stirring occasionally until they begin to pop. Ultimately, the mixture should simmer for approximately 15-20 minutes until it reaches a custardy consistency. Accordingly, you’ll know the filling is ready when it thickens enough to coat the back of a spoon.
One crucial tip: taste your filling as you cook. The tartness levels can vary significantly between batches of berries. If needed, adjust the sweetness gradually, remembering that the filling will taste slightly less sweet once baked. The final texture should resemble a thick, jammy consistency – not too runny, yet still spreadable.
Time-Tested Baking Secrets
Mastering the art of baking requires precise timing and careful attention to temperature control. After preparing your gooseberry pie with care, the baking process demands equal precision to achieve perfect results.
Temperature control techniques
Primarily, start by preheating your oven to 400°F (200°C). The initial high temperature helps create a crisp, flaky crust. After the first 20 minutes, lower the temperature to 350°F (175°C) for the remaining baking time. This two-stage baking method ensures proper crust development while allowing the filling to cook thoroughly.
At this point, timing becomes crucial. The total baking duration typically ranges between 45-60 minutes, depending on your oven’s characteristics. Alternatively, if you notice the crust browning too quickly, cover it with aluminum foil to prevent over-darkening.

Visual cues for doneness
The perfect gooseberry pie displays several telltale signs of readiness. Look for these key indicators:
- A rich, golden-brown crust color across the surface
- Bubbling filling, especially visible through the vents
- A glossy sheen on the filling
In contrast to many baked goods, gooseberry pie benefits from a slightly longer baking time rather than under-baking. The extended baking ensures the filling reaches the proper consistency and the bottom crust cooks completely.
Cooling and serving traditions
The cooling process proves equally important as the baking itself. After removing your pie from the oven, allow it to cool completely. This crucial step enables the filling to set properly, ensuring clean slices when served.
For optimal results, let the pie rest for at least 10 minutes initially. Throughout this time, the filling continues to thicken and develop its final texture. Some bakers prefer chilling the pie overnight in the refrigerator, then bringing it to room temperature before serving.
The traditional serving method includes a scoop of vanilla ice cream or a dollop of freshly whipped cream. These classic accompaniments complement the natural tartness of the gooseberries while adding a creamy contrast to the flaky crust.
Remember that patience during the cooling process rewards you with perfectly set slices. A properly cooled pie maintains its structure, allowing you to appreciate both the visual appeal and the carefully crafted layers of flavor in each bite.

Conclusion
Gooseberry pie stands as more than just a dessert in our family – it represents generations of love, tradition, and culinary expertise. Through careful berry selection, precise pastry techniques, and time-tested baking methods, this recipe delivers the perfect balance of sweet and tart flavors wrapped in a flaky, golden crust.
My grandmother’s methods, particularly her emphasis on cold ingredients and proper berry preparation, ensure consistent results. Though the process requires patience and attention to detail, the reward comes in that first perfect slice – the filling holding its shape while the crust crumbles just right.
Remember that practice makes perfect when crafting this traditional dessert. Start with fresh ingredients, take time with each step, and soon you’ll master the art of gooseberry pie making. The joy of sharing this beloved family recipe brings me as much satisfaction as watching others experience their first bite of this classic treat.
FAQs
Q1. How should I prepare gooseberries for a pie? Before using gooseberries in a pie, rinse them thoroughly and remove both the stem and the small brown end on each berry. This process, known as “topping and tailing,” is essential for achieving the best flavor and texture in your pie filling.
Q2. What’s the secret to a perfect pie crust? The key to a perfect pie crust is temperature control. Use very cold butter, ideally grated directly into the flour mixture. Work quickly and chill your tools and ingredients beforehand. The dough should be just moist enough to clump when squeezed, typically requiring 1/4 to 1/2 cup of ice-cold water.
Q3. How do I achieve the right balance of sweetness in a gooseberry pie? The sweetness in a gooseberry pie depends on the type of berries used. Green gooseberries typically require about 2 cups of sugar for every 3 cups of berries. Red varieties need less sugar due to their natural sweetness. Taste your filling as you cook and adjust the sweetness gradually.
Q4. What’s the best method for baking a gooseberry pie? Start by preheating your oven to 400°F (200°C). Bake the pie for 20 minutes, then lower the temperature to 350°F (175°C) for the remaining baking time, usually 25-40 minutes more. Look for a golden-brown crust and bubbling filling as signs of doneness.
Q5. How long should I let the pie cool before serving? Allow your gooseberry pie to cool completely before serving. Let it rest for at least 10 minutes initially, but for best results, consider chilling it overnight in the refrigerator and bringing it to room temperature before serving. This cooling process allows the filling to set properly, ensuring clean slices.